We said that we were getting back into the swing of things with gusto and we meant it! While there is a mitzvah in lighting oil candles, an impromptu inspiration brainstorm got us thinking about making our own soy wax candles. The bright colors, the different patterns, the excitement of trying something new! What can we say? This project was really fun and with a bit of time and patience, not that difficult to do.
Ingredients to Make Your Own Hanukkah Candles:

- Candle Wicks
- Soy Wax
- Candle Wick Centering Device
- Melting Pot/s
- *The above ingredients can be bought together in a kit https://a.co/d/5WSRRHU
- Empty Menorah Glass Cups (https://a.co/d/4O1uquU)
- Candle Making Color Dye https://a.co/d/ifwRTVl
Tips and Tricks to Getting it Right:
Making your own soy wax Hanukkah candles can be a rewarding and enjoyable experience, as we discovered in our own journey. The process, while simple, offers a delightful opportunity for creativity and personalization. We hope that by sharing our experience we can inspire you to embark on your own candle-making adventure!
Types of Menorah cups:

We specifically recommend these menorah cups: Ner Mitzvah Chanukah Menorah Oil Glass Cups - Glass Oil Insert Cups for Menorahs - #11 (9 Pack). That’s because we bought other types of cups from a different brand and they did not fit our acrylic menorah. Make sure you test the cups in your menorah before you make the candles.
What to know about working with soy wax:
- Melt the soy wax at a low temperature, it melts really fast. Make sure you don't have the heat on high because the wax can burn and turn black
- Flake soy wax can also be melted in the microwave
- Use a cardboard cup and fold it into a peak or use a syringe to pour the melted candle for more precision so the glass cup doesn’t stain the borders
- We made our own centering devices with cardboard because we did not have enough metal ones

Preparing and pouring the wax:
- Use the foam base where the empty cups come packaged to pour the melted candles.
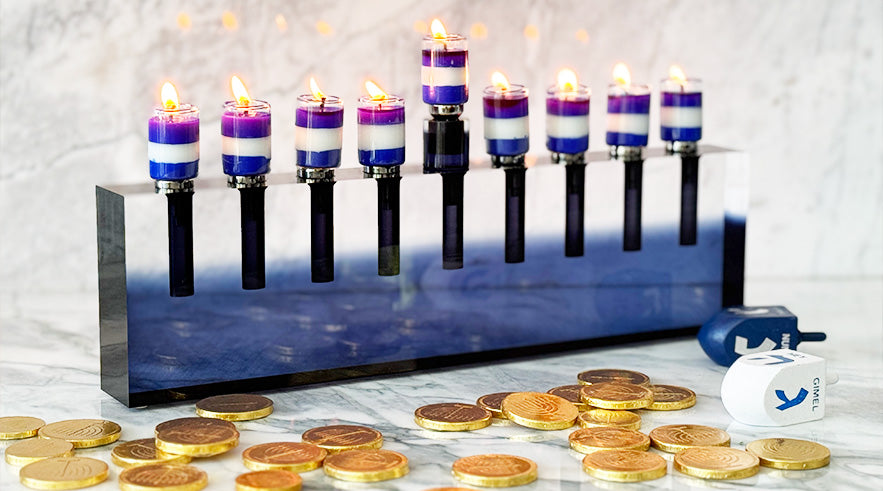
- If you are combining colors like we did. Make sure you wait until the first color is dry. Then when pouring the second color wait for the melted wax to cool down. If you pour it when it is still super hot it will melt the first color down a little bit and colors might mix up or residues from the first color can float to the second color.
- When you are done, cut the wick to your desired height.

A note on designs:
- If you are doing the “Israeli Flag colors,” as we did, make sure you add white color dye, if you leave the wax only it will be clear

- If you are doing the diagonal design like we did, make sure you find a rack to tilt the cup when pouring the first color. Once the wax is dry, rotate the cup so the next color comes diagonally to the other side. Then the 3rd color can be poured with the cup sitting up straight.

1 comment
So beautiful great idea